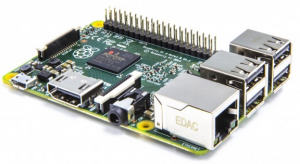
Raspberry Pi
| (Není zobrazeno 42 mezilehlých verzí od 1 uživatele.) | |||
| Řádka 1: | Řádka 1: | ||
| + | {| class="toccolours" cellpadding="5" style="float: right; clear: right; margin: 0 0 1em 1em; font-size: 85%; width: 30em" | ||
| + | | colspan="2" style="text-align: center; font-size: larger; background-color: lightgreen;" | '''''NAG-IoE''''' | ||
| − | + | |- style="vertical-align: top;" | |
| − | + | | | |
| − | + | ||
| − | + | ||
http://www.youtube.com/user/RaspberryPiTutorials/videos | http://www.youtube.com/user/RaspberryPiTutorials/videos | ||
http://www.youtube.com/user/RaspberryPiBeginners/videos?flow=grid&view=0 | http://www.youtube.com/user/RaspberryPiBeginners/videos?flow=grid&view=0 | ||
| + | |||
| + | Soutěž [[NAG-IoE]] | ||
| + | [[Soubor:NAG-IoE.png|300px|NAG-IoE|link=NAG-IoE]] | ||
| + | |||
| + | [[Soubor:raspberry_03.jpg|200px|link=https://magpi.raspberrypi.com/books/beginners-guide-4th-ed/|MagPi - A Magazine for Raspberry Pi Users]] | ||
| + | |||
| + | [[Soubor:PDF.gif]] [https://magazines-attachments.raspberrypi.org/books/full_pdfs/000/000/038/original/BeginnersGuide-4thEd-Eng_v2.pdf Beginners Guide] | ||
| + | |||
| + | [[Soubor:Raspberry_Pi_3.png|300px|link=https://learn.sparkfun.com/tutorials/raspberry-gpio Sparkfun|Raspberry gPIo]] | ||
| + | |||
| + | [[Soubor:Raspberry_Pi_2.png|300px|link=http://www.zive.cz/clanky/vyzkouseli-jsme-mikropocitac-raspberry-pi/sc-3-a-165391/default.aspx#utm_medium=selfpromo&utm_source=avmania&utm_campaign=RSSfeed|Živě - Vyzkoušeli jsme mikropočítač Raspberry Pi]] | ||
| + | |||
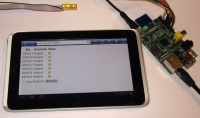
| + | [[Soubor:raspberry_02.jpg|200px|link=http://mcu.cz/news.php?extend.3176.3|RaspberryPi - ovládání GPIO přes web]] | ||
| + | |||
| + | |} | ||
| + | |||
| + | == IoT UPJŠ == | ||
| + | |||
| + | DU: shlédnou videa (alt. z jiných zdrojů) o Raspberry. https://youtu.be/fdBSbarhAUY https://youtu.be/0VwchnogzuQ | ||
| + | Potvrďte splnění | ||
| + | |||
| + | {{#widget:YouTube|id=fdBSbarhAUY|height=270|width=360|IoT UPJŠ - Základy IoT - Raspberry Pi - 1. intro, Raspbian, SSH, VNC|right}} | ||
| + | {{#widget:YouTube|id=0VwchnogzuQ|height=270|width=360|IoT UPJŠ - Základy IoT - Raspberry Pi - 2. GPIO, WiringPi, I2C|right}} | ||
| + | |||
| + | VNC: ssh pi@192.168.1.238 | ||
| + | ifconfig | ||
| + | |||
| + | sudo raspi.config | ||
| + | |||
| + | rasbian na PC | ||
| + | |||
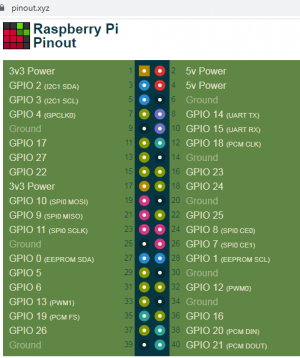
| + | == Python == | ||
| + | [[Soubor:RpiPython_03_PINOUT.png|300px|right|link=https://pinout.xyz/|Raspberry Pi GPIO Pinout]] | ||
| + | [[Soubor:PDF.gif]] [https://blog.withcode.uk/wp-content/uploads/2016/10/RPi_GPIO_python_quickstart_guide.pdf Raspberry Pi Python GPIO Quick start guide] | ||
| + | install GPIO: sudo apt-get install python-rpi.gpio python3-rpi.gpio | ||
| + | |||
| + | Install library: | ||
| + | sudo apt-get install python-rpi.gpio python3-rpi.gpio | ||
| + | |||
| + | Running the Script: | ||
| + | sudo python blinker.py | ||
| + | |||
| + | |||
| + | [[Soubor:RpiPython_01.png|300px]][[Soubor:RpiPython_02.png|300px]] | ||
| + | |||
| + | ===RPi.GPIO === | ||
| + | |||
| + | <source lang="Python"> | ||
| + | |||
| + | import RPi.GPIO as GPIO | ||
| + | from time import sleep | ||
| + | |||
| + | GPIO.setwarnings(False) | ||
| + | GPIO.setmode(GPIO.BOARD) | ||
| + | GPIO.setup(18, GPIO.OUT, initial=GPIO.LOW) | ||
| + | |||
| + | while True: | ||
| + | GPIO.output (18, GPIO.HIGH) | ||
| + | sleep(0.2) | ||
| + | GPIO.output (18, GPIO.LOW) | ||
| + | sleep (0.2) | ||
| + | |||
| + | </source> | ||
| + | |||
| + | [https://create.withcode.uk/ create.withcode.uk] | ||
| + | |||
| + | [[Soubor:RpiPython_03.png|300px|link=https://create.withcode.uk/]] | ||
| + | |||
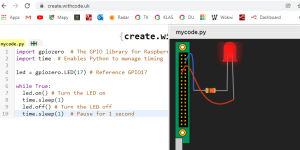
| + | ===gpiozero=== | ||
| + | |||
| + | Source: https://automaticaddison.com/how-to-blink-an-led-on-raspberry-pi-3-model-b/ | ||
| + | |||
| + | <source lang="Python"> | ||
| + | |||
| + | import gpiozero # The GPIO library for Raspberry Pi | ||
| + | import time # Enables Python to manage timing | ||
| + | |||
| + | led = gpiozero.LED(17) # Reference GPIO17 | ||
| + | |||
| + | while True: | ||
| + | led.on() # Turn the LED on | ||
| + | time.sleep(1) | ||
| + | led.off() # Turn the LED off | ||
| + | time.sleep(1) # Pause for 1 second | ||
| + | </source> | ||
| + | |||
| + | [https://create.withcode.uk/ create.withcode.uk] | ||
| + | |||
| + | [[Soubor:RpiPython_04.png|300px|link=https://create.withcode.uk/]] | ||
| + | |||
| + | === BOARD vs BCM === | ||
| + | |||
| + | source: https://learn.sparkfun.com/tutorials/raspberry-gpio#python-rpigpio-example | ||
| + | |||
| + | <source lang="Python"> | ||
| + | |||
| + | import RPi.GPIO as GPIO # External module imports | ||
| + | import time | ||
| + | |||
| + | # Pin Definitons: | ||
| + | ledPin = 23 # GPIO 23 = pin 16 | ||
| + | butPin = 17 # GPIO 17 = pin 11 | ||
| + | |||
| + | # choose BOARD or BCM | ||
| + | GPIO.setmode(GPIO.BCM) # BCM for GPIO numbering | ||
| + | # GPIO.setmode(GPIO.BOARD) # BOARD for header pin numbering | ||
| + | |||
| + | GPIO.setwarnings(False) | ||
| + | |||
| + | GPIO.setup(ledPin, GPIO.OUT) # LED pin set as output GPIO.setup(23, GPIO.OUT) | ||
| + | # GPIO.setup(butPin, GPIO.IN, pull_up_down=GPIO.PUD_UP) # Button pin set as input w/ pull-up | ||
| + | GPIO.setup(butPin, GPIO.IN, pull_up_down=GPIO.PUD_DOWN) # Button pin set as input w/ pull-down | ||
| + | |||
| + | # Initial state for LEDs: | ||
| + | GPIO.output(ledPin, GPIO.LOW) # GPIO.output(23, 0) = GPIO.output(23, False) | ||
| + | time.sleep(0.1) # wait 0,1 s | ||
| + | GPIO.output(ledPin, GPIO.HIGH) # GPIO.output(23, 1) = GPIO.output(23, True) | ||
| + | time.sleep(0.1) # wait 0,1 s | ||
| + | |||
| + | |||
| + | while True: | ||
| + | |||
| + | # print("Here we go! Press CTRL+C to exit") | ||
| + | # try: | ||
| + | # while 1: | ||
| + | if GPIO.input(butPin): # button is released | ||
| + | GPIO.output(ledPin, GPIO.LOW) | ||
| + | |||
| + | else: # button is pressed: | ||
| + | GPIO.output(ledPin, GPIO.HIGH) | ||
| + | time.sleep(0.075) | ||
| + | GPIO.output(ledPin, GPIO.LOW) | ||
| + | time.sleep(0.075) | ||
| + | |||
| + | # except KeyboardInterrupt: # If CTRL+C is pressed, exit cleanly: | ||
| + | GPIO.cleanup() # cleanup all GPIO | ||
| + | |||
| + | </source> | ||
| + | |||
| + | ===blink.py=== | ||
| + | |||
| + | source: /opt/nagioe/python_demo/blink.py | ||
| + | |||
| + | <source lang="Python"> | ||
| + | import RPi.GPIO as GPIO | ||
| + | import time | ||
| + | |||
| + | def blink(pin): # blinking function | ||
| + | GPIO.output(pin,GPIO.HIGH) | ||
| + | time.sleep(1) | ||
| + | GPIO.output(pin,GPIO.LOW) | ||
| + | time.sleep(1) | ||
| + | return | ||
| + | |||
| + | GPIO.setmode(GPIO.BOARD) # to use Raspberry Pi board pin numbers | ||
| + | GPIO.setwarnings(False) | ||
| + | GPIO.setup(11, GPIO.OUT) # set up GPIO output channel | ||
| + | |||
| + | for i in range(0,50): | ||
| + | blink(11) | ||
| + | |||
| + | GPIO.cleanup() | ||
| + | |||
| + | </source> | ||
| + | |||
| + | ===push.py=== | ||
| + | |||
| + | source: /opt/nagioe/python_demo/push.py | ||
| + | |||
| + | <source lang="Python"> | ||
| + | import RPi.GPIO as GPIO | ||
| + | import time | ||
| + | |||
| + | print GPIO.RPI_REVISION | ||
| + | print GPIO.VERSION | ||
| + | GPIO.setmode(GPIO.BOARD) | ||
| + | |||
| + | pin=40 | ||
| + | |||
| + | GPIO.setup(pin, GPIO.IN) | ||
| + | GPIO.setup(pin, GPIO.IN, pull_up_down=GPIO.PUD_UP) | ||
| + | while (1): | ||
| + | print GPIO.input(pin) | ||
| + | time.sleep(0.5) | ||
| + | #GPIO.output(pin, False) | ||
| + | GPIO.cleanup() | ||
| + | </source> | ||
| + | |||
| + | === Control LED === | ||
| + | |||
| + | <source lang="Python"> | ||
| + | |||
| + | import RPi.GPIO as GPIO | ||
| + | import time | ||
| + | |||
| + | def blink(pin, pin2): # blinking function | ||
| + | GPIO.output(pin,GPIO.HIGH) | ||
| + | time.sleep(0.1) | ||
| + | GPIO.output(pin,GPIO.LOW) | ||
| + | time.sleep(0.1) | ||
| + | GPIO.output(pin2,GPIO.HIGH) | ||
| + | time.sleep(0.1) | ||
| + | GPIO.output(pin2,GPIO.LOW) | ||
| + | time.sleep(0.1) | ||
| + | return | ||
| + | |||
| + | GPIO.setmode(GPIO.BOARD) # to use Raspberry Pi board pin numbers | ||
| + | GPIO.setwarnings(False) | ||
| + | GPIO.setup(11, GPIO.OUT) # set up GPIO output channel | ||
| + | GPIO.setup(13, GPIO.OUT) | ||
| + | GPIO.setup(40, GPIO.IN, pull_up_down=GPIO.PUD_UP) | ||
| + | |||
| + | blink(11, 13) | ||
| + | |||
| + | while (1): | ||
| + | if GPIO.input(40) == 0: | ||
| + | blink(11, 13) | ||
| + | time.sleep(0.1) | ||
| + | GPIO.cleanup() | ||
| + | </source> | ||
| + | |||
| + | === Turn LED === | ||
| + | source: http://engr.uconn.edu/~song/classes/nes/RPi.pdf | ||
| + | |||
| + | <source lang="Python"> | ||
| + | |||
| + | import RPi.GPIO as GPIO | ||
| + | import time | ||
| + | def main(): | ||
| + | GPIO.cleanup() | ||
| + | GPIO.setmode(GPIO.BOARD) # to use Raspberry Pi board pin numbers | ||
| + | GPIO.setup(11, GPIO.OUT) # set up GPIO output channel | ||
| + | |||
| + | while True: | ||
| + | GPIO.output(11, GPIO.LOW) # set RPi board pin 11 low. Turn off LED. | ||
| + | time.sleep(1) | ||
| + | GPIO.output(11, GPIO.HIGH) # set RPi board pin 11 high. Turn on LED. | ||
| + | time.sleep(2) | ||
| + | main() | ||
| + | |||
| + | </source> | ||
| + | |||
| + | == Wiring Pi == | ||
| + | |||
| + | [[Soubor:RBP_Pinout.png|300px|link=https://pinout.xyz/pinout/wiringpi/]] | ||
| + | |||
| + | {{#widget:YouTube|id=J6KsTz6hjfU|height=270|width=360|Popis|right}} | ||
| + | |||
| + | ===[http://wiringpi.com/examples/blink/ Blink]=== | ||
| + | |||
| + | [[Soubor:RB_LED.png|300px|link=http://wiringpi.com/examples/blink/]] | ||
| + | |||
| + | <source lang"C"> | ||
| + | |||
| + | #include <wiringPi.h> | ||
| + | int main (void) | ||
| + | { | ||
| + | wiringPiSetup () ; | ||
| + | pinMode (0, OUTPUT) ; | ||
| + | for (;;) | ||
| + | { | ||
| + | digitalWrite (0, HIGH) ; | ||
| + | delay (500) ; | ||
| + | digitalWrite (0, LOW) ; | ||
| + | delay (500) ; | ||
| + | } | ||
| + | return 0 ; | ||
| + | } | ||
| + | </source> | ||
| + | |||
| + | To compile and run: | ||
| + | gcc -Wall -o blink blink.c -lwiringPi | ||
| + | sudo ./blink | ||
| + | |||
| + | === Set up the ports === | ||
| + | |||
| + | [[soubor:RB2_LED-PUSCH-SERVO.png|400px]] | ||
| + | |||
| + | [http://raspi.tv/2013/how-to-use-wiringpi2-for-python-on-the-raspberry-pi-in-raspbian How to use WiringPi2 for Python on the Raspberry Pi in Raspbian part 1] | ||
| + | |||
| + | <source lang"C"> | ||
| + | |||
| + | # GPIO port numbers | ||
| + | import wiringpi2 as wiringpi | ||
| + | wiringpi.wiringPiSetupGpio() | ||
| + | wiringpi.pinMode(25, 0) # sets GPIO 25 to input | ||
| + | wiringpi.pinMode(24, 1) # sets GPIO 24 to output | ||
| + | wiringpi.pinMode(18, 2) # sets GPIO 18 to PWM mode | ||
| + | |||
| + | # wiringpi numbers | ||
| + | import wiringpi2 as wiringpi | ||
| + | wiringpi.wiringPiSetup() | ||
| + | wiringpi.pinMode(6, 0) # sets WP pin 6 to input | ||
| + | wiringpi.pinMode(5, 1) # sets WP pin 5 to output | ||
| + | wiringpi.pinMode(1, 2) # sets WP pin 1 to PWM mode | ||
| + | |||
| + | # Physical P1 header pin numbers | ||
| + | import wiringpi2 as wiringpi | ||
| + | wiringPiSetupPhys() | ||
| + | wiringpi.pinMode(22, 0) # sets P1 pin 22 to input | ||
| + | wiringpi.pinMode(18, 1) # sets P1 pin 18 to output | ||
| + | wiringpi.pinMode(12, 2) # sets P1 pin 12 to PWM mode | ||
| + | |||
| + | </source> | ||
| + | |||
| + | == RaspBian == | ||
| + | |||
| + | Username: pi, password: NAGIoE2015 | ||
| + | |||
| + | Re-mapping Keyboard: XKBLAYOUT=”gb” Change “gb” to “us” | ||
| + | sudo vi /etc/default/keyboard | ||
| + | |||
| + | Start the desktop by typing: (http://engr.uconn.edu/~song/classes/nes/RPi.pdf) | ||
| + | startx | ||
| + | |||
| + | Booting your Raspberry Pi for the first time | ||
| + | sudo raspi-config | ||
| + | |||
| + | Update apt-get package index files: | ||
| + | sudo apt-get update | ||
| + | |||
| + | Install SSH: | ||
| + | sudo apt-get install ssh | ||
| + | |||
| + | Start SSH server: | ||
| + | sudo /etc/init.d/ssh start | ||
| + | |||
| + | To start the SSH server every time the Pi boots up: | ||
| + | sudo update-rc.d ssh defaults | ||
| + | |||
| + | [http://www.raspberrypi-spy.co.uk/2014/05/how-to-autostart-apps-in-rasbian-lxde-desktop/ How To Autostart Apps In Rasbian LXDE Desktop] | ||
| + | sudo nano /etc/xdg/lxsession/LXDE-pi/autostart | ||
| + | |||
| + | Auto-run Python Scripts | ||
| + | @/usr/bin/python /home/pi/example.py | ||
Aktuální verze z 10. 2. 2022, 20:00
| NAG-IoE | |
|
http://www.youtube.com/user/RaspberryPiTutorials/videos http://www.youtube.com/user/RaspberryPiBeginners/videos?flow=grid&view=0 Soutěž NAG-IoE
| |


Obsah |
IoT UPJŠ
DU: shlédnou videa (alt. z jiných zdrojů) o Raspberry. https://youtu.be/fdBSbarhAUY https://youtu.be/0VwchnogzuQ Potvrďte splnění
VNC: ssh pi@192.168.1.238
ifconfig
sudo raspi.config
rasbian na PC
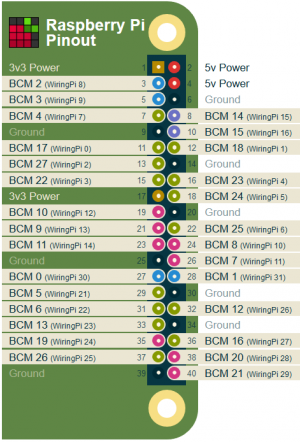
Python
![]() Raspberry Pi Python GPIO Quick start guide
Raspberry Pi Python GPIO Quick start guide
install GPIO: sudo apt-get install python-rpi.gpio python3-rpi.gpio
Install library:
sudo apt-get install python-rpi.gpio python3-rpi.gpio
Running the Script:
sudo python blinker.py


RPi.GPIO
import RPi.GPIO as GPIO
from time import sleep

GPIO.setwarnings(False)
GPIO.setmode(GPIO.BOARD)
GPIO.setup(18, GPIO.OUT, initial=GPIO.LOW)

while True:
   GPIO.output (18, GPIO.HIGH)
   sleep(0.2)
   GPIO.output (18, GPIO.LOW)
   sleep (0.2)

gpiozero
Source: https://automaticaddison.com/how-to-blink-an-led-on-raspberry-pi-3-model-b/
import gpiozero  # The GPIO library for Raspberry Pi
import time  # Enables Python to manage timing

led = gpiozero.LED(17) # Reference GPIO17

while True:
  led.on() # Turn the LED on
  time.sleep(1)
  led.off() # Turn the LED off
  time.sleep(1)  # Pause for 1 second
BOARD vs BCM
source: https://learn.sparkfun.com/tutorials/raspberry-gpio#python-rpigpio-example
import RPi.GPIO as GPIO # External module imports
import time

# Pin Definitons:
ledPin = 23     # GPIO 23 = pin 16
butPin = 17     # GPIO 17 = pin 11

# choose BOARD or BCM
GPIO.setmode(GPIO.BCM)               # BCM for GPIO numbering
# GPIO.setmode(GPIO.BOARD)             # BOARD for header pin numbering

GPIO.setwarnings(False)

GPIO.setup(ledPin, GPIO.OUT) # LED pin set as output GPIO.setup(23, GPIO.OUT)
# GPIO.setup(butPin, GPIO.IN, pull_up_down=GPIO.PUD_UP) # Button pin set as input w/ pull-up
GPIO.setup(butPin, GPIO.IN, pull_up_down=GPIO.PUD_DOWN) # Button pin set as input w/ pull-down

# Initial state for LEDs:
GPIO.output(ledPin, GPIO.LOW) # GPIO.output(23, 0) = GPIO.output(23, False)
time.sleep(0.1)  # wait 0,1 s
GPIO.output(ledPin, GPIO.HIGH) # GPIO.output(23, 1) = GPIO.output(23, True)
time.sleep(0.1)  # wait 0,1 s


while True:

# print("Here we go! Press CTRL+C to exit")
# try:
#   while 1:
        if GPIO.input(butPin):      # button is released
            GPIO.output(ledPin, GPIO.LOW)

        else:                       # button is pressed:
            GPIO.output(ledPin, GPIO.HIGH)
            time.sleep(0.075)
            GPIO.output(ledPin, GPIO.LOW)
            time.sleep(0.075)

# except KeyboardInterrupt: # If CTRL+C is pressed, exit cleanly:
    GPIO.cleanup() # cleanup all GPIO
blink.py
source: /opt/nagioe/python_demo/blink.py
   import RPi.GPIO as GPIO
   import time

def blink(pin):       # blinking function
    GPIO.output(pin,GPIO.HIGH)
    time.sleep(1)
    GPIO.output(pin,GPIO.LOW)
    time.sleep(1)
    return

   GPIO.setmode(GPIO.BOARD)  # to use Raspberry Pi board pin numbers
   GPIO.setwarnings(False)
   GPIO.setup(11, GPIO.OUT)  # set up GPIO output channel

for i in range(0,50):
	blink(11)

GPIO.cleanup()
push.py
source: /opt/nagioe/python_demo/push.py
   import RPi.GPIO as GPIO
   import time

   print GPIO.RPI_REVISION
   print GPIO.VERSION
   GPIO.setmode(GPIO.BOARD)

pin=40

   GPIO.setup(pin, GPIO.IN)
   GPIO.setup(pin, GPIO.IN, pull_up_down=GPIO.PUD_UP)
while (1):
  print GPIO.input(pin)
  time.sleep(0.5)
  #GPIO.output(pin, False)
GPIO.cleanup()
Control LED
import RPi.GPIO as GPIO
import time

def blink(pin, pin2):         # blinking function
        GPIO.output(pin,GPIO.HIGH)
        time.sleep(0.1)
        GPIO.output(pin,GPIO.LOW)
        time.sleep(0.1)
        GPIO.output(pin2,GPIO.HIGH)
        time.sleep(0.1)
        GPIO.output(pin2,GPIO.LOW)
        time.sleep(0.1)
        return

   GPIO.setmode(GPIO.BOARD)  # to use Raspberry Pi board pin numbers
   GPIO.setwarnings(False)
   GPIO.setup(11, GPIO.OUT) # set up GPIO output channel
   GPIO.setup(13, GPIO.OUT)
   GPIO.setup(40, GPIO.IN, pull_up_down=GPIO.PUD_UP)

blink(11, 13)

while (1):
	if GPIO.input(40) == 0:
		blink(11, 13)
	time.sleep(0.1)
GPIO.cleanup()
Turn LED
source: http://engr.uconn.edu/~song/classes/nes/RPi.pdf
import RPi.GPIO as GPIO
import time
def main():
 GPIO.cleanup()
 GPIO.setmode(GPIO.BOARD) # to use Raspberry Pi board pin numbers
 GPIO.setup(11, GPIO.OUT) # set up GPIO output channel

 while True:
  GPIO.output(11, GPIO.LOW) # set RPi board pin 11 low. Turn off LED.
  time.sleep(1)
  GPIO.output(11, GPIO.HIGH) # set RPi board pin 11 high. Turn on LED.
  time.sleep(2)
main()
Wiring Pi
Blink
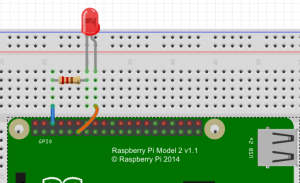
#include <wiringPi.h>
int main (void)
{
  wiringPiSetup () ;
  pinMode (0, OUTPUT) ;
  for (;;)
  {
    digitalWrite (0, HIGH) ;
    delay (500) ;
    digitalWrite (0,  LOW) ;
    delay (500) ;
  }
  return 0 ;
}
To compile and run:
gcc -Wall -o blink blink.c -lwiringPi
sudo ./blink
Set up the ports

How to use WiringPi2 for Python on the Raspberry Pi in Raspbian part 1
# GPIO port numbers
import wiringpi2 as wiringpi
wiringpi.wiringPiSetupGpio()
wiringpi.pinMode(25, 0) # sets GPIO 25 to input
wiringpi.pinMode(24, 1) # sets GPIO 24 to output
wiringpi.pinMode(18, 2) # sets GPIO 18 to PWM mode

# wiringpi numbers
import wiringpi2 as wiringpi
wiringpi.wiringPiSetup()
wiringpi.pinMode(6, 0) # sets WP pin 6 to input
wiringpi.pinMode(5, 1) # sets WP pin 5 to output
wiringpi.pinMode(1, 2) # sets WP pin 1 to PWM mode

# Physical P1 header pin numbers
import wiringpi2 as wiringpi
wiringPiSetupPhys()
wiringpi.pinMode(22, 0) # sets P1 pin 22 to input
wiringpi.pinMode(18, 1) # sets P1 pin 18 to output
wiringpi.pinMode(12, 2) # sets P1 pin 12 to PWM mode
RaspBian
Username: pi, password: NAGIoE2015
Re-mapping Keyboard: XKBLAYOUT=”gb” Change “gb” to “us”
sudo vi /etc/default/keyboard
Start the desktop by typing: (http://engr.uconn.edu/~song/classes/nes/RPi.pdf)
startx
Booting your Raspberry Pi for the first time
sudo raspi-config
Update apt-get package index files:
sudo apt-get update
Install SSH:
sudo apt-get install ssh
Start SSH server:
sudo /etc/init.d/ssh start
To start the SSH server every time the Pi boots up:
sudo update-rc.d ssh defaults
How To Autostart Apps In Rasbian LXDE Desktop
sudo nano /etc/xdg/lxsession/LXDE-pi/autostart
Auto-run Python Scripts
@/usr/bin/python /home/pi/example.py