Raspberry Pi
(→Raspberry) |
|||
| Řádka 4: | Řádka 4: | ||
|- style="vertical-align: top;" | |- style="vertical-align: top;" | ||
| | | | ||
| + | http://www.youtube.com/user/RaspberryPiTutorials/videos | ||
| + | |||
| + | http://www.youtube.com/user/RaspberryPiBeginners/videos?flow=grid&view=0 | ||
Soutěž [[NAG-IoE]] | Soutěž [[NAG-IoE]] | ||
[[Soubor:NAG-IoE.png|300px|NAG-IoE|link=NAG-IoE]] | [[Soubor:NAG-IoE.png|300px|NAG-IoE|link=NAG-IoE]] | ||
| + | |||
| + | [[Soubor:raspberry_03.jpg|200px|link=https://magpi.raspberrypi.com/books/beginners-guide-4th-ed/|MagPi - A Magazine for Raspberry Pi Users]] | ||
| + | |||
| + | [[Soubor:PDF.gif]] [https://magazines-attachments.raspberrypi.org/books/full_pdfs/000/000/038/original/BeginnersGuide-4thEd-Eng_v2.pdf Beginners Guide] | ||
|} | |} | ||
| Řádka 14: | Řádka 21: | ||
== Raspberry == | == Raspberry == | ||
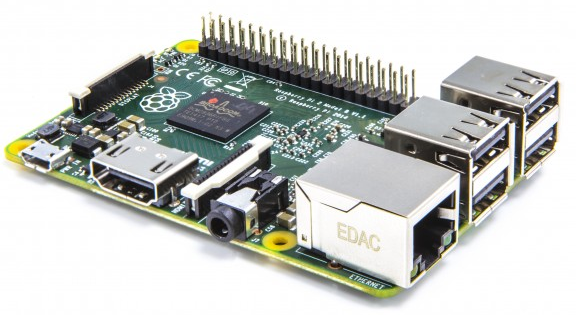
| − | [[Soubor: | + | [[Soubor:Raspberry_Pi_2.png|link=http://www.zive.cz/clanky/vyzkouseli-jsme-mikropocitac-raspberry-pi/sc-3-a-165391/default.aspx#utm_medium=selfpromo&utm_source=avmania&utm_campaign=RSSfeed]] |
| − | + | ||
| − | + | ||
| − | + | ||
| − | + | ||
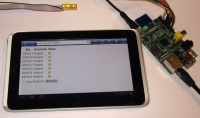
[[Soubor:raspberry_02.jpg|200px|link=http://mcu.cz/news.php?extend.3176.3|RaspberryPi - ovládání GPIO přes web]] | [[Soubor:raspberry_02.jpg|200px|link=http://mcu.cz/news.php?extend.3176.3|RaspberryPi - ovládání GPIO přes web]] | ||
| − | |||
| − | |||
== IoT UPJŠ == | == IoT UPJŠ == | ||
Verze z 4. 2. 2022, 14:30
| NAG-IoE | |
|
http://www.youtube.com/user/RaspberryPiTutorials/videos http://www.youtube.com/user/RaspberryPiBeginners/videos?flow=grid&view=0 Soutěž NAG-IoE
| |


Obsah |
Raspberry
IoT UPJŠ
DU: shlédnou videa (alt. z jiných zdrojů) o Raspberry. https://youtu.be/fdBSbarhAUY https://youtu.be/0VwchnogzuQ Potvrďte splnění
VNC: ssh pi@192.168.1.238 ifconfig
sudo raspi.config
rasbian na PC
create.withcode.uk
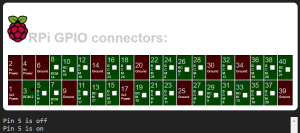
![]() Raspberry Pi Python GPIO Quick start guide
Raspberry Pi Python GPIO Quick start guide
Introduction
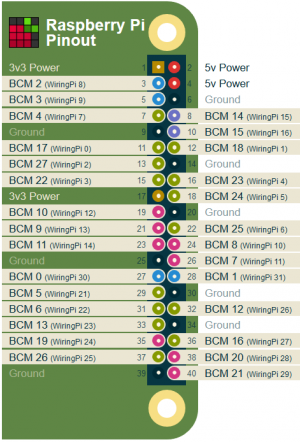
Raspberry gPIo
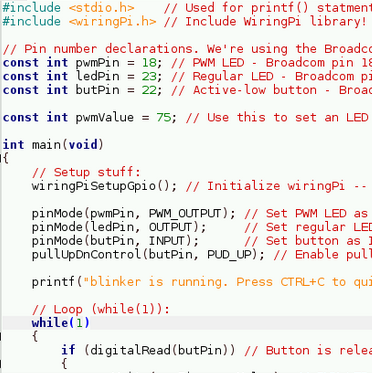
Wiring Pi
Blink
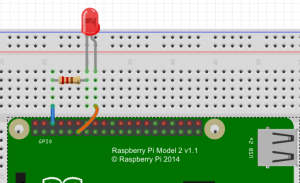
#include <wiringPi.h>
int main (void)
{
  wiringPiSetup () ;
  pinMode (0, OUTPUT) ;
  for (;;)
  {
    digitalWrite (0, HIGH) ; delay (500) ;
    digitalWrite (0,  LOW) ; delay (500) ;
  }
  return 0 ;
}
To compile and run:
gcc -Wall -o blink blink.c -lwiringPi
sudo ./blink
Set up the ports

How to use WiringPi2 for Python on the Raspberry Pi in Raspbian part 1
# GPIO port numbers
import wiringpi2 as wiringpi
wiringpi.wiringPiSetupGpio()
wiringpi.pinMode(25, 0) # sets GPIO 25 to input
wiringpi.pinMode(24, 1) # sets GPIO 24 to output
wiringpi.pinMode(18, 2) # sets GPIO 18 to PWM mode

# wiringpi numbers
import wiringpi2 as wiringpi
wiringpi.wiringPiSetup()
wiringpi.pinMode(6, 0) # sets WP pin 6 to input
wiringpi.pinMode(5, 1) # sets WP pin 5 to output
wiringpi.pinMode(1, 2) # sets WP pin 1 to PWM mode

# Physical P1 header pin numbers
import wiringpi2 as wiringpi
wiringPiSetupPhys()
wiringpi.pinMode(22, 0) # sets P1 pin 22 to input
wiringpi.pinMode(18, 1) # sets P1 pin 18 to output
wiringpi.pinMode(12, 2) # sets P1 pin 12 to PWM mode
Raspberry Pi with 7-segment display

Python
https://pypi.python.org/pypi/RPi.GPIO
/opt/nagioe/python_demo/blink.py
/opt/nagioe/python_demo/push.py
blink.py
import RPi.GPIO as GPIO
import time
# blinking function
def blink(pin):
        GPIO.output(pin,GPIO.HIGH)
        time.sleep(1)
        GPIO.output(pin,GPIO.LOW)
        time.sleep(1)
        return
# to use Raspberry Pi board pin numbers
GPIO.setmode(GPIO.BOARD)
GPIO.setwarnings(False)
# set up GPIO output channel
GPIO.setup(11, GPIO.OUT)
# blink GPIO17 50 times
for i in range(0,50):
	blink(11)
GPIO.cleanup()
push.py
import RPi.GPIO as GPIO
import time
print GPIO.RPI_REVISION
print GPIO.VERSION
GPIO.setmode(GPIO.BOARD)

pin=40

GPIO.setup(pin, GPIO.IN)
GPIO.setup(pin, GPIO.IN, pull_up_down=GPIO.PUD_UP)
while (1):
  print GPIO.input(pin)
  time.sleep(0.5)
#GPIO.output(pin, False)
GPIO.cleanup()
Control LED
import RPi.GPIO as GPIO
import time
# blinking function
def blink(pin, pin2):
        GPIO.output(pin,GPIO.HIGH)
        time.sleep(0.1)
        GPIO.output(pin,GPIO.LOW)
        time.sleep(0.1)
        GPIO.output(pin2,GPIO.HIGH)
        time.sleep(0.1)
        GPIO.output(pin2,GPIO.LOW)
        time.sleep(0.1)
        return
# to use Raspberry Pi board pin numbers
GPIO.setmode(GPIO.BOARD)
GPIO.setwarnings(False)
# set up GPIO output channel
GPIO.setup(11, GPIO.OUT)
GPIO.setup(13, GPIO.OUT)

GPIO.setup(40, GPIO.IN, pull_up_down=GPIO.PUD_UP)

blink(11, 13)

while (1):
	if GPIO.input(40) == 0:
		blink(11, 13)
	time.sleep(0.1)
GPIO.cleanup()
Turn LED
source: http://engr.uconn.edu/~song/classes/nes/RPi.pdf
import RPi.GPIO as GPIO
import time
def main():
 GPIO.cleanup()
 GPIO.setmode(GPIO.BOARD) # to use Raspberry Pi board pin numbers
 GPIO.setup(11, GPIO.OUT) # set up GPIO output channel

 while True:
  GPIO.output(11, GPIO.LOW) # set RPi board pin 11 low. Turn off LED.
  time.sleep(1)
  GPIO.output(11, GPIO.HIGH) # set RPi board pin 11 high. Turn on LED.
  time.sleep(2)
main()
RaspBian
Username: pi, password: NAGIoE2015
Re-mapping Keyboard: XKBLAYOUT=”gb” Change “gb” to “us”
sudo vi /etc/default/keyboard
Start the desktop by typing: (http://engr.uconn.edu/~song/classes/nes/RPi.pdf)
startx
Booting your Raspberry Pi for the first time
sudo raspi-config
Update apt-get package index files:
sudo apt-get update
Install SSH:
sudo apt-get install ssh
Start SSH server:
sudo /etc/init.d/ssh start
To start the SSH server every time the Pi boots up:
sudo update-rc.d ssh defaults
How To Autostart Apps In Rasbian LXDE Desktop
sudo nano /etc/xdg/lxsession/LXDE-pi/autostart
Auto-run Python Scripts
@/usr/bin/python /home/pi/example.py